Wednesday, April 18, 2012

Sugar sheets, and edible ink...who knew???

I apologize profusely about the long absence from posting on my blog.  Life happened, and as you can guess, I'm not a die hard blogger.  But...I've been getting lots of questions from lots of you about the Canon copier, and the printed sugar sheets, so I'm going to put it down on paper for ease and accessability!  My husband bought me this Canon MG 5320 copier for my birthday (he's very thorough when he researches new products)...about $100 for that...ordered from Amazon.  It uses edible ink cartridges that are ordered from KopyKake.com,..they cost $75, but last quite awhile for me as I pretty much use the sheets for  
my cookies only.  It makes short work of logos, and photos.  Sorry, I just don't have the patience, or the desire to do those things by hand.  Also, the sugar sheets themselves come from Kopykake, and as you will see, there are several different sizes to choose from.  Here's the business card sized one loaded, ready to go for an order I will be working on today.
Here's what the package looks like...shows you what sized sheet, how many on the sheet, and, as you can see, there's 24 per package...they run about $29 dollars or so.
Kopykake provides a free online service to use these sheets, and they walk you thru the process.  You have to log your new sheets in with a code number to get access to the programs.

When you push the start button, it brings up this screen, and then you select which size you're using, and you go from there.  As you can see, lots of different sizes.  My daughter lives too far away to make use of Mom's machine, so she will probably get one of her own, as she has begun to do cakes, and word is starting to get out. So, these will do large sheets as well.

    There's also another program called IPhoto Express that we bought for $28 dollars that Kopykake also carries...I don't use it as often, but it definately has it's advantages.  The support team is fairly good at answering questions...I'm not as computer literate as my husband, but together we get it done, and have had great success with the copier.  Hope that helps...if you have more questions, let me know.  Sharon

Monday, January 23, 2012

Marbling techniques


  Today, we're going to talk about marbling techniques...I'm sure some of the other cookiers have done tutorials on this, and even videos, which are definately better.  But you get pictures on my blog, because I'm still a newbie too, and I don't do videos...yet! :)  (give me time)  As you can see here, my cookie is flooded with icing, and while it's still wet, you make lines with a different color, or 2 or 3,...and they don't even need to be really straight.  So, don't stress about them.


You can see my 2nd set of colors here

and the pink added here.  Still just drawing lines...I even play around with the thicknesses of frosting

Now, take your toothpick, or whatever you want to use, and start on side, and draw the pick thru the lines of icing, staying close to the outside edge.  Bring it around thru the white, still along the edge, and swing on down to the bottom of the cookie and go thru the lines again.  This time, you notice the icing is pulled the other direction.  Keep right on going, following the shape of the cookie, and as you come to the top where you started, drop down a little and go thru the lines again.
 You can't see it on this one very well, but in the process of my drawing, then stopping to take pictures, the icing started to form it's crust, and so the lines became jagged as the pick went thru the icing.

So my hubby snapped pics as I drew thru another one...these may be a little hard to see, but I'v made the first loop, and am coming back around for the 2nd go-round.

You can see it a little better here.

Still moving the toothpick...it doesn't come up out of the icing until you're done.

See, it really doesn't matter if your lines are straight because, you mess 'em up anyway. :)
 And when you are done, you can embellish with dots, or lines, or whatever... that's the fun of it.

Ok, here's a round one.  Flood, draw circles, and grab your toothpick!
 There's any number of ways you can go thru the lines...I feel like a flower, so let's start at the center and pull the pic out toward the edge...then, just as you get close, swing around and come back to the center.  Keep on going, right thru the center to the other side , and then back to the center. Do this as many times as you want to get the effect you want.


And this is what you end up with.

One more... a circle with lines...wet icing...this is called a wet-on-wet technique, by the way. It's the only way this marbling works.

Ok, here goes the toothpick...this one's really easy to see.
 See my toothpick stuck there, so I can stop and take a pic...I know, kinda weird, but hey! It got the job done.

 If you follow the swirls in the icing, you can tell where the pic went thru.


Monday, January 09, 2012

Happy New Year...let's get going


 Yeah, I know...it was the tail end of November when I posted last.  December turned out to be a really busy month for me, and was a test of my abilities.  I think I passed.  Except for posting on my blog...hmmm...I failed that one big time.  So, I will try harder to do a better job this year, plus show you how I do some of my cookies.  And I'm talking about the ones I do out of other shapes.  It's becoming one of my favorite things to do...sort of a personal challenge to myself, and it pleases my sense of frugality and practicalness(is that a word?).


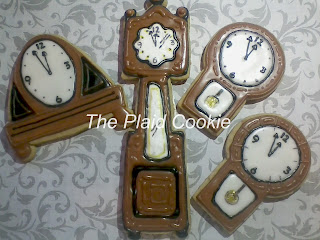
 Like these clocks...all made with geometric shapes.  Ovals, rectangles, squares, and circles. Sure, you have to trim sometimes, to get the shapes you're after, but that's the challenge.
     The clocks were done for my Dad, and he was delighted with them. Then I threw in the New Years Cookies to go with them.


Monday, November 21, 2011

Christmas Plaids and Supportive Hubby Make Me Happy

    My birthday this year hits a milestone...one that I'm happy to say hits me mildly as far as physically and mentally???!  And it's a happy milestone, because I've found something that brings out my passions anew.  I was afraid that the creative juices had stopped flowing, and I had lost the incentive to search for them again.  What was I gonna do when retirement hit to stay active and involved? Well, if you're patient and wait for God to appoint your ways, all kinds of good things happen, especially if you're brave enough to trust Him. Sometimes that's hard in and of itself. 

      One day ,while browsing on the computer for ideas to do some cookies, I came across a whole slew of people doing them. My, they were beautiful! "I can do that" I thot to myself.  And thus started my journey.  It surely has been fun. And a good(and smart) husband likes having a happy wife...it works to EVERYONE'S benefit. ;) Mine is no exception...he's the one who said one day.."I bought you an early birthday present to use on your cookies." Three or 4 days later, a Canon printer, and an order of sugar sheets showed up at our front door.


    So, yes, I've cheated...sort of. These aren't truely "hand decorated" cookies, but they are still tasty, and beautiful.  I need to work on the trims a bit...not especially happy with those, but I will get there.
     If you have a supportive and enthusiastic hubby, or maybe someone else who cheers you on, and helps when they can...tell them how much you appreciate them.


Friday, November 11, 2011

Christmas Will Be Here Soon

     This is the first Christmas order of the season...I know, we haven't even had Thanksgiving yet!!! Nevertheless, here they are. The snowflakes aren't hard, just a little more time consuming...maybe as I get better, they'll take less time. It's kinda hard to see the detail in the blue ones....maybe that's just as well...that way you can't see the boo-boos. :)

Thursday, November 10, 2011

Fabulous Fall.


      After all the leaves and "acorns" (the candy ones), I felt like doing something different. I got "stuck" on gourds. I becamed fascinated with the coloring of them, especially the ornamental ones. And the bumps.... so here is what came of that.
     And I think I'm just as intrigued with the textures as I am the shapes and colorings.
      One of the other cookiers, whose blog I follow, also did some gourds...Pam @CookieCrazie. She did some amazing work...go check it out. There have also been several others that have done them, which has been fun for me to see...it's amazing to see how each of us can take the same theme and do such totally different work. 

Friday, October 28, 2011

A Spanish Birthday

  
My nephew is a senior in high school this year, and just turned 18!!! Wow!  When did that happen??  They seem to grow up faster than your own kids... probably because we're not watching them as closely as we do our own.   Nevertheless, here he is...a young man getting ready to venture out into the world.  He has taken to his spanish courses like a duck takes to water. With great enthusiasm!!  And he's good at it.


His Mom ordered cookies to celebrate his birthday... green, white, and red...some spanish phrases, etc.  My daughter, who speaks spanish well, helped me with the phrases, and the rest was sorta up to me.

I originally froze, for 30 minutes, the cookies that I wanted to write on. Then after they sat for a little bit with the writing on them, the writing seemed to fade.  Out came the frosting bags to do the letters...I know,...double steps.  But you do that sometimes in the effort to learn.


I can tell the difference between the two pics...can you?  The one directly above the one to the left is not done with the frosting.


This one in the middle, also got a treatment of icing, first in black, and then when I realized I should be using white icing instead of black( ease of reading), I went back over it in white.  Which, unfortunately , you don't get to see.(It's gone already)


Next up...I want to try some gourds.  Weird, I know, but hey, gotta give it a try.  Sorry about the long interval between posts.  I will try to do better.